
Last Updated on January 3, 2026 by Jawad
Keeping your mechanical keyboard clean is important. A clean keyboard looks better, works better, and lasts longer. Dust, crumbs, skin oils, and drink spills can make keys sticky or stop working. This article will teach you, step by step, how to clean a mechanical keyboard the right way. The words are simple and the steps are easy to follow.
Why clean your keyboard?
- Better typing and gaming: Sticky or dirty keys can slow you down. Cleaning keeps keys feeling smooth.
- Hygiene: Keyboards collect germs. Cleaning helps reduce bacteria and bad smells.
- Longer life: Removing dust and debris stops parts from wearing out quickly.
- Looks nice: A clean keyboard simply looks better on your desk.
How often should you clean it?
- Daily: Wipe the surface quickly with a dry cloth to remove dust.
- Weekly: Light cleaning with a brush and compressed air to remove crumbs and loose dirt.
- Monthly: Remove keycaps for a deeper clean if you use the keyboard a lot.
- After spills: Clean immediately. The faster you act, the less damage.
Tools and supplies you need
Before you start, gather the right tools. You do not need expensive items. Most are cheap and easy to find.
- Keycap puller: A small tool that helps remove keycaps without damage. Many keyboards include one.
- Soft brush: A small paint brush or makeup brush to sweep out dust.
- Compressed air can: Blows out dust from between switches and crevices.
- Microfiber cloth: For wiping the surface without scratching.
- Isopropyl alcohol (70% or 90%): For disinfecting and cleaning sticky spots. 70% is safe and common.
- Cotton swabs / Q-tips: For cleaning tight areas around switches.
- Small bowl or container: To hold keycaps while they soak.
- Warm water and mild dish soap: For washing keycaps.
- Paper towels: For drying and protecting surfaces.
- Towel or mat: To work on so you don’t lose small parts.
Optional:
- Switch opener: For advanced users who want to clean or lube switches.
- Ultrasonic cleaner: For very dirty keycaps (careful with printed keycaps).
Safety first: unplug and power down
Always unplug your keyboard from the computer before cleaning. If your keyboard is wireless, remove the batteries or turn it off. This prevents short circuits and accidental key presses while you work.
Step-by-step cleaning (quick clean)
This is a fast method when your keyboard is not too dirty.
- Turn off and unplug. Make sure the keyboard is not connected to any power source.
- Shake gently. Turn the keyboard upside down and give it a light shake to dislodge loose crumbs and dust. Do this over a trash can.
- Use compressed air. Hold the can upright and blow air between the keys. Move the can in short bursts to avoid moisture from the can.
- Brush the surface. Use the soft brush to sweep out any remaining dust.
- Wipe with microfiber cloth. Lightly dampen the cloth with water or isopropyl alcohol and wipe the top surface of the keys and the keyboard body.
This quick clean takes a few minutes and is perfect for weekly maintenance.
Step-by-step cleaning (deep clean with keycap removal)
A deep clean is best every few months, or if your keys are sticky or very dirty.
- Unplug and prepare workspace. Lay a towel on the table and place your keyboard on it.
- Take a photo of your keyboard layout. This helps you put keycaps back in the right places. A quick phone photo works fine.
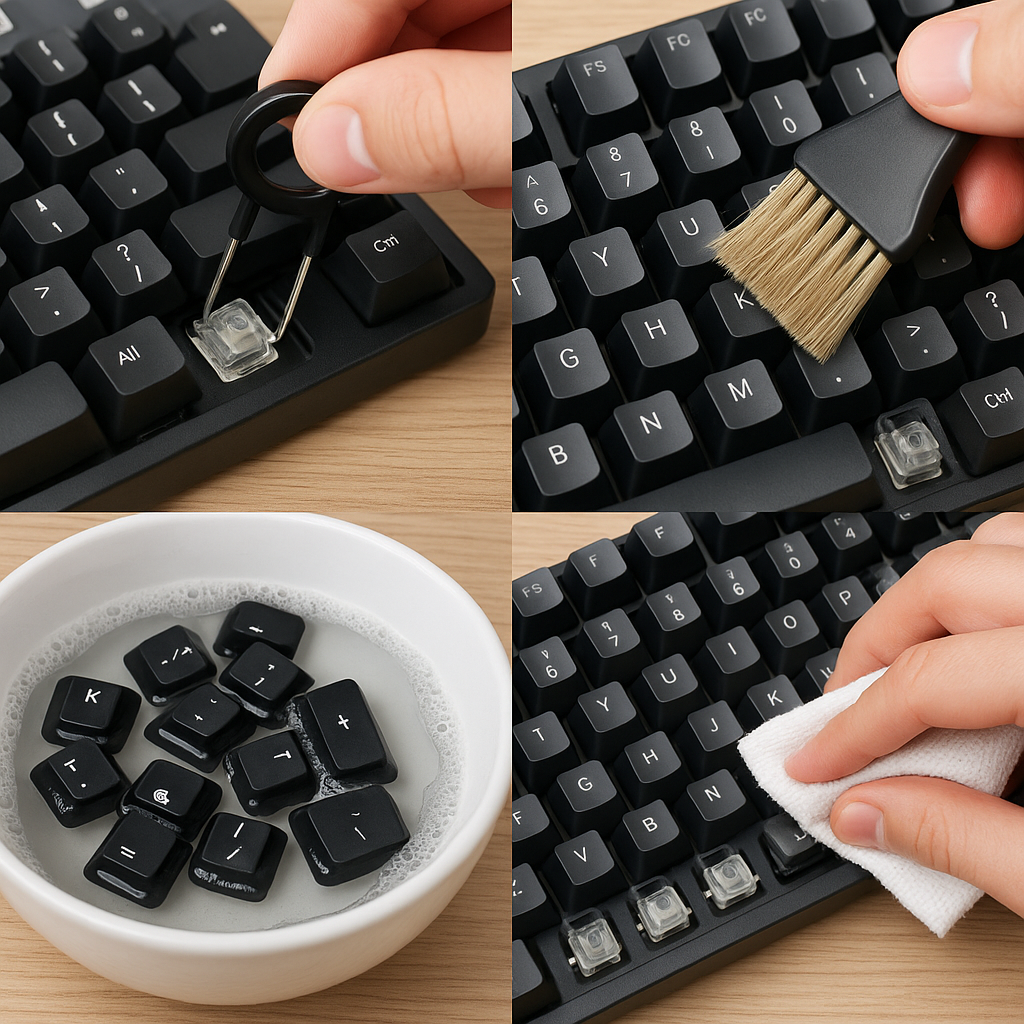
- Remove keycaps. Use the keycap puller to gently pull off each keycap. Start from one side and work your way across. For larger keys (spacebar, Enter, Shift), pull carefully as they may have stabilizers.
- Place keycaps in a bowl. Put the keycaps in a bowl with warm water and a drop of mild dish soap. Let them soak for 15–30 minutes. Do not soak keycaps that have special materials (like wood) or electronic parts.
- Clean the keyboard base. While keycaps soak, use compressed air and a brush to clean the keyboard base and switches. Use cotton swabs dipped lightly in isopropyl alcohol to clean around the switch stems and crevices. Be careful not to drip alcohol into the switches.
- Rinse and dry keycaps. After soaking, rinse keycaps with clean water and lay them on a towel to dry fully. Make sure they are completely dry before reattaching — this can take several hours.
- Clean stabilizers and large keys. If you removed larger keys, check the stabilizers. Wipe them clean and, if needed, apply a small amount of stabilizer lubricant designed for keyboards.
- Reattach keycaps. Refer to your photo and press keycaps back onto their switches. Ensure each keycap sits straight and firmly.
Cleaning spilled liquids
Spills are the most urgent and scary problem, but quick action can save your keyboard.
- Unplug immediately. Remove power without pressing keys.
- Tilt and drain. Turn the keyboard upside down to let the liquid flow out.
- Remove keycaps and dry. Take off the keycaps and wipe up the spill with paper towels.
- Clean sticky residue. Use a cloth dampened with isopropyl alcohol to clean sticky spots. For heavy spills (soda), consider removing the switches or the PCB if you know how—otherwise take it to a repair shop.
- Let it dry. Leave the keyboard in a dry, warm place for 24–48 hours. Some people place it near a fan. Do not use a hairdryer on high heat — high heat can warp plastic.
- Test. After full drying, reconnect and test each key. If keys do not work, seek professional repair or consider replacing the keyboard.
Cleaning different keycap materials
- ABS keycaps: Most common and safe to wash with warm soapy water. They may yellow over time from sun and oils.
- PBT keycaps: More durable and less shiny. Safe to wash with warm soapy water.
- Double-shot or dye-sublimated keycaps: Safe to wash; legends will not fade.
- Painted or metal keycaps: Be careful. Avoid long soaking for painted caps to prevent paint peeling.
- Wood or artisan keycaps: Do not soak. Wipe gently with a damp cloth.
Extra tips — cleaning switches and stabilizers
- Compressed air first. Blow air to remove dust from switch housings.
- Cotton swabs with alcohol. Use for sticky spots but avoid excess liquid.
- Switch lubing and opening: Only for advanced users. If you open switches, work in a clean space and remember the small springs and parts.
- Stabilizer maintenance: If stabilizers are rattle or feel rough, consider clipping or lubing them if they are designed to be modified.
What to avoid
- Do not use bleach or harsh cleaners. They can damage the plastic and coatings.
- Do not pour liquid directly onto the keyboard. Always apply liquid to a cloth first.
- Do not use a hairdryer on high heat. Use room temperature drying or a fan.
- Avoid dishwashers. Hot water and detergents can warp keycaps unless manufacturer says it is safe.
Quick daily routine (1–2 minutes)
- Wipe the keyboard with a dry microfiber cloth.
- Use compressed air quick bursts for crumbs.
- Wash hands before long typing sessions to reduce oils.
Troubleshooting common problems
- Sticky keys after cleaning: Likely damp keycaps. Remove and dry fully before reattaching.
- Keys not registering: Check connection, try another USB port, test on another device. If still not working, clean under the switch and inspect the PCB.
- Keys sticking after a spill: Residue from sugary drinks often causes this. Deep clean, remove keycaps, and clean with isopropyl alcohol. If unsuccessful, seek repair.
Should I open my keyboard or switch? (When to seek help)
Opening switches or the keyboard case can void warranties and is risky for beginners. Consider professional help if:
- The keyboard is under warranty and the issue may be covered.
- You spilled sticky liquids deep into the keyboard and you are unsure how to proceed.
- Keys or switches stop working after basic cleaning.
If you enjoy tinkering and your warranty is already expired, open it only after learning from tutorials and following safety steps.
Long-term care and prevention
- Use a dust cover or keyboard cover when not in use to block dust.
- Keep food and drinks away from the desk while typing.
- Wash your hands before long typing sessions.
- Store keycap puller and small brush near your desk for quick cleaning.
Final checklist before you finish
- Keyboard unplugged during cleaning.
- All keycaps dry before reattaching.
- No excess liquid left near switches.
- Test all keys after reassembly.
- If anything feels wrong, stop and inspect again.
Conclusion
Cleaning a mechanical keyboard is not hard. With a few simple tools and careful steps, you can keep your keyboard looking and feeling like new. Regular light cleaning and occasional deep cleaning will make your keyboard last longer and feel better to use. If you spill something or face a serious issue, act quickly and consider professional help if needed. Happy typing!

Jawad is a passionate tech enthusiast and writer who loves exploring the latest trends in hardware, gadgets, and digital innovation. With a sharp eye for performance and value, he delivers in-depth recommendations and buying guides to help readers make smarter tech decisions.