Last Updated on February 23, 2026 by Jawad
Introduction
Mechanical keyboards have exploded in popularity among gamers, writers, programmers, and tech enthusiasts. One of the biggest reasons people customize their keyboards is to improve sound, smoothness, and typing comfort. Among all keyboard modifications, lubing switches is often considered the single most effective upgrade you can make. Properly lubricated switches feel smoother, sound deeper, and reduce unwanted scratchiness or spring ping.
This complete guide explains everything you need to know about how to lube keyboard switches — from understanding why lubrication matters to choosing the right tools and techniques. Whether you’re building your first custom keyboard or upgrading an existing one, this article will walk you through the entire process step by step.
What Does “Lubing Keyboard Switches” Mean?
Lubing switches refers to applying a thin layer of specialized lubricant to internal parts of a mechanical keyboard switch. Mechanical switches contain several moving components — the stem, housing, and spring — that rub against each other during keystrokes. Over time, friction can cause scratchy sounds, inconsistent feel, or unwanted noise.
By adding lubricant to key contact points, you reduce friction and create smoother movement. The result is often described as “buttery smooth” typing.
Unlike general-purpose oils or household grease, keyboard lubricants are designed to maintain electrical performance while improving mechanical feel. Applying the correct type and amount of lube is essential, because too much lubricant can make switches feel sluggish or mushy.
Why Should You Lube Keyboard Switches?
Before diving into the process, it’s important to understand why people invest time in lubing switches.
1. Smoother Keystrokes
Lubrication reduces resistance inside the switch, eliminating scratchiness. Linear switches especially benefit from this, as smooth travel is one of their defining traits.
2. Better Sound Profile
Many enthusiasts chase a specific keyboard sound — deeper, quieter, or more “thocky.” Lubing dampens unwanted noise from plastic-on-plastic friction and spring vibrations.
3. Reduced Spring Ping
Some switches produce a metallic ringing sound when pressed. Lubricating the spring can significantly reduce this issue.
4. Enhanced Consistency
Factory switches can vary slightly from key to key. Lubing helps create a more uniform typing experience across the board.
5. Customization and Personalization
Keyboard building is a hobby centered on personalization. Lubing allows you to tailor how your keyboard feels exactly to your preference.
Types of Mechanical Switches and Lubing Differences
Not all switches behave the same, and your lubing method may vary depending on the type you’re using.
Linear Switches
Linear switches move straight down without tactile bumps. Examples include Cherry MX Red or Gateron Yellow. These benefit the most from lubrication because smoothness is critical to their design.
Tactile Switches
Tactile switches provide a noticeable bump during actuation. Lubing can improve smoothness but must be done carefully to avoid reducing the tactile feel.
Clicky Switches
Clicky switches produce a loud click using internal mechanisms. Most enthusiasts avoid lubing clicky switches because it can dampen the signature click and change their character.
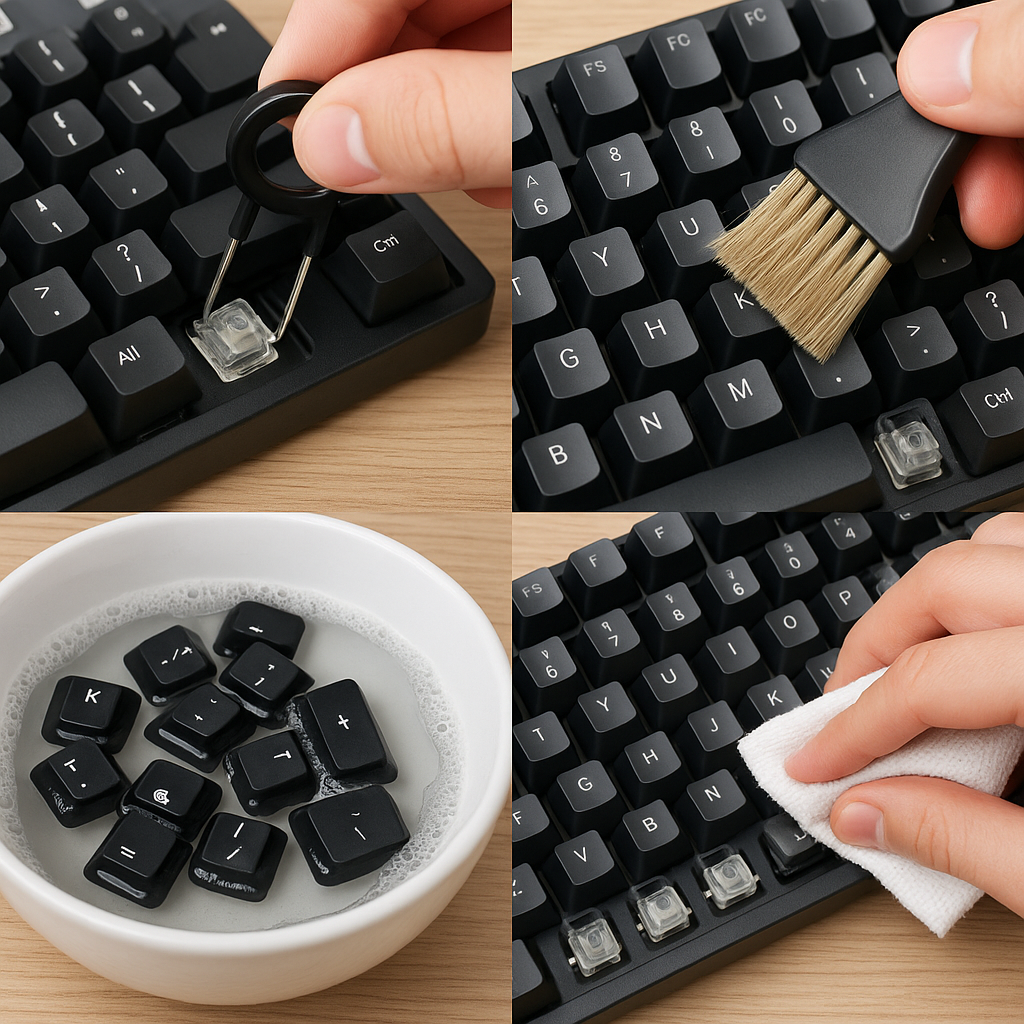
Tools and Materials You Need
Before starting, gather the right equipment. Using proper tools ensures a cleaner, safer process.
Essential Tools:
- Switch opener
- Small brush (size 00 or similar)
- Keycap puller
- Switch puller (if hot-swappable keyboard)
- Tweezers
- Lubricant (such as Krytox or Tribosys)
Optional but Helpful:
- Switch holder or tray
- Desk mat
- Gloves for cleanliness
Avoid using WD-40, cooking oil, or generic grease — these can damage switches or attract dust.
Choosing the Right Lubricant
Selecting the correct lubricant is crucial. Different viscosities create different typing experiences.
Krytox 205g0
One of the most popular options for linear switches. It’s thick enough to smooth movement without feeling overly heavy.
Tribosys 3203 / 3204
These are lighter lubricants, often preferred for tactile switches because they preserve the bump better.
Krytox 105 Oil
A thin oil commonly used for bag-lubing springs rather than coating stems or housings.
Your choice ultimately depends on the switch type and desired feel.
Preparing Your Keyboard
Before opening switches, make sure your workspace is clean and organized.
- Remove all keycaps using a keycap puller.
- Take switches out if your keyboard is hot-swappable. If it’s soldered, you’ll need to desolder each switch.
- Arrange switches in rows or trays so you don’t lose small components.
Good lighting helps you see where lubricant is applied. Many enthusiasts recommend working slowly rather than rushing through large batches.
Opening the Switches
Mechanical switches consist of several tiny parts:
- Top housing
- Stem
- Spring
- Bottom housing
Use a switch opener or carefully press the clips on each side. Once opened, place each component neatly in front of you.
Organization is key — losing even one spring can interrupt your workflow.
Step-by-Step Guide to Lubing Switches
Step 1: Lubing the Bottom Housing
Dip your brush lightly into the lubricant. You only need a small amount — excess lube can ruin the feel.
Apply a thin layer along:
- The rails where the stem slides
- The center pole area (lightly)
Avoid covering electrical contact leaves, as too much lube here may affect performance.
Step 2: Lubing the Stem
Hold the stem with tweezers and lightly brush lubricant onto:
- Side rails
- Front and back surfaces
Avoid the legs on tactile switches if you want to preserve the bump.
Step 3: Lubing the Spring
There are two common methods:
Brush Method: Lightly coat the spring with a thin layer of lubricant.
Bag-Lubing Method: Place multiple springs into a small bag with a drop of oil, seal it, and shake gently. This distributes lubricant evenly and saves time.
Step 4: Lubing the Top Housing (Optional)
Some builders lightly lube the inside of the top housing to reduce friction noise. This step is optional but can enhance sound quality.
Reassembling the Switch
Once all parts are lubed:
- Insert the spring into the bottom housing.
- Place the stem on top with correct orientation.
- Snap the top housing back into place.
Press gently until all clips lock. Double-check that the switch feels smooth when pressed.
Testing Before Full Installation
Before reinstalling every switch, test a few:
- Press them by hand to check smoothness.
- Install a few switches into the keyboard and type briefly.
If switches feel sluggish or muted, you may have applied too much lube. Adjust your technique before continuing.
Common Mistakes Beginners Make
Overlubing
The most frequent mistake is using too much lubricant. Remember, less is more. You should barely see the lube after brushing it on.
Lubing Tactile Legs
Applying lube to tactile legs can remove the bump, making the switch feel linear.
Using the Wrong Brush
Large or stiff brushes apply uneven layers. Use a fine, soft brush designed for detail work.
Rushing the Process
Lubing switches can take hours, especially for full keyboards. Taking breaks helps maintain consistency.
How Long Does It Take?
Time varies depending on experience and keyboard size.
- Beginner: 4–6 hours for a full keyboard
- Intermediate: 2–4 hours
- Experienced builders: Around 1–2 hours
Many enthusiasts treat switch lubing as a relaxing part of the keyboard-building hobby.
Sound Differences Before and After Lubing
One of the most noticeable changes is sound. Unlubed switches may sound sharp or hollow, while lubed switches tend to produce deeper, cleaner tones.
However, sound is influenced by more than just lubrication. Case material, plate type, foam, and keycaps also play significant roles. Lubing simply refines the base sound signature.
Is Factory Lubing Enough?
Some modern switches come pre-lubed from the factory. While these can feel smoother than stock switches, enthusiasts often re-lube them for improved consistency.
Factory lubing can sometimes be uneven or too light. Hand-lubing ensures precise coverage tailored to your preference.
Advanced Tips for Enthusiasts
Film Your Switches
Switch films reduce housing wobble and can further enhance sound when combined with lubrication.
Mix Lubricant Types
Some advanced builders combine thick grease with thin oil for a balanced feel. Experimentation helps you discover your personal preference.
Test One Switch First
Before committing to an entire batch, lube one switch and test it. This prevents wasting time if you dislike the result.
Should Beginners Lube Switches?
Absolutely — but patience is essential. The process may feel intimidating at first, yet it becomes easier with practice. Many people find their first lubing session surprisingly enjoyable.
Start with a small batch and gradually build confidence. Even modest improvements in smoothness can make typing more enjoyable.
Maintenance and Longevity
Properly lubed switches can last years without needing maintenance. High-quality lubricants remain stable over long periods and don’t dry out quickly.
Keep your keyboard clean and avoid exposing it to dust or extreme heat. Regular cleaning helps preserve the smooth feel you worked hard to achieve.
FAQs
No — it’s optional. Many switches work fine out of the box. However, lubing can make switches smoother, quieter, and more consistent, which is why enthusiasts recommend it.
Linear switches usually benefit the most because smoothness is their main feature. Tactile switches can also improve, but you must avoid lubing the tactile legs too heavily. Clicky switches are generally not recommended for lubing because it reduces their click sound.
Overlubing can make switches feel sluggish, mushy, or slow to return. It may also reduce sound clarity. If this happens, you might need to clean the switch and start again with less lubricant.
It’s possible to “spray lube” switches, but it’s not recommended. Opening the switch gives you precise control and prevents damage to internal components or electrical contacts.
It can — if done incorrectly. Applying thick lube to the tactile legs reduces the bump. If you want to preserve tactility, use a thinner lube and avoid the stem legs.
No. Avoid WD-40, cooking oil, or general-purpose grease. These products can damage plastic, attract dust, and reduce switch lifespan. Always use lubricants designed for mechanical keyboards.
Yes, in most cases. Lubing reduces friction noise and spring ping, creating a deeper and more controlled sound profile. However, overall sound also depends on the keyboard case, plate, and keycaps.
Final Thoughts
Lubing keyboard switches is one of the most rewarding modifications in the mechanical keyboard world. It transforms an average typing experience into something smoother, quieter, and uniquely personalized. While the process requires time and attention to detail, the results are often worth the effort.
Whether you’re a gamer chasing faster, quieter keystrokes or a writer seeking a more comfortable typing feel, learning how to lube switches gives you full control over your keyboard’s performance. With the right tools, a steady hand, and a bit of patience, you can elevate your keyboard from stock to enthusiast-level quality.
As you gain experience, you’ll develop your own techniques and preferences. Some people favor ultra-smooth linear switches, while others prefer lightly lubed tactiles that retain their crisp feedback. The beauty of keyboard customization lies in experimentation — and lubing switches is often the first step into that creative journey.

Jawad is a passionate tech enthusiast and writer who loves exploring the latest trends in hardware, gadgets, and digital innovation. With a sharp eye for performance and value, he delivers in-depth recommendations and buying guides to help readers make smarter tech decisions.